Monday 25 April 2016

How to upgrade windows 8 to 10 by useing MDT?

MDT?

Posted in ArticlesMCSEServers • 6 months ago • Written by Shais • 5 Comments
In a Enterprise network, directly upgrading the network operating systems are difficult task. But upgrade to Windows 10 using MDT is the easiest way to upgrade the old machines. As network admin you already know the importance of OS and application deployment rules in a enterprise network. And also must be familiar with Microsoft Deployment Toolkit, Windows Deployment Services and deployment operations.
In this practice lab I will show you how to upgrade to Windows 10 using MDT and refresh old machines with new operating system. You need to be familiar with MDT installation and creating deployment share with MDT. If you are beginner and don’t know the basic of deploying Windows with MDT and WDS, I recommend you to read the below article before continuing this post.
  1. How to install MDT and ADK in Windows Server 2016?
  2. How to Deploy Windows 10 using MDT?
Try to create your own test lab and continue this article. In the final stage I had faced with an error, hope it will not issue that for you.

Step 1: Import Windows 10 full source to MDT

Adding Windows 10 full sources to MDT will be done through MDT Deployment Workbench. I already have my deployment lab which installed and configured MDT as deployment Server in a Windows Server 2016. So go to open deployment workbench and import Windows 10 and create an upgrade task sequence.
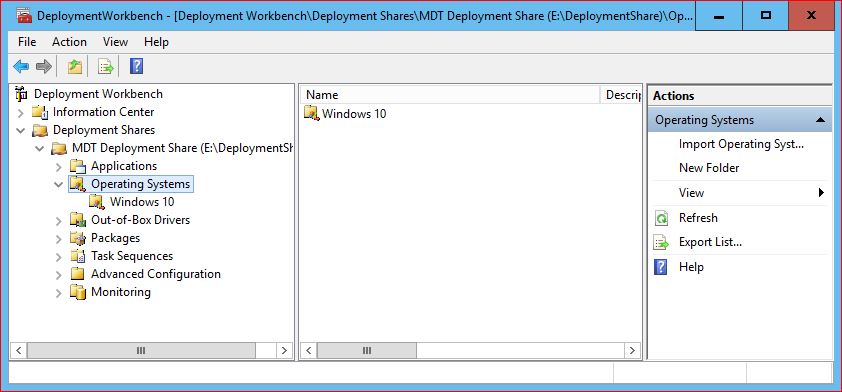
  1. Open Deployment Workbench from start menu in your MDT machine. Create a folder for Windows 10 on Operating system section.
Upgrade to Windows 10 Using MDT
2. Simply right click Windows 10 folder and select Import Operating System to open the OS Type page.
Operating System Type for MDT
3. On the OS Type page select Full set of source files and go to the next page.
Windows 10 Sources
Windows 10 Sources
4. Put the Windows 10 disc to DVD ROM or mount the Windows 10 Image and select the directory drive then click Next.
Windows 10 Enterprise Evaluation x64
5. On the Summary page read details and click Next to start importing Windows 10. Finally on Confirmation page click Finish to close the page and the Windows 10 should be ready.

Step 2: Create an Upgrade Task Sequence in MDT

On the Task Sequence section of Deployment workbench, create a folder relevant to upgrade to Windows 10 using MDT.
  1. Right click the Task Sequence and create a folder, so do right click the folder and select New Task Sequence. Now on the General Settings page fill out the task id, name and comments then click Next.
General Settings - Upgrade Windows 7 to Windows 10
General Settings – Upgrade Windows 7 to Windows 10
2. Select the Standard Client Upgrade Task Sequence for task sequence template then click Next.
Standard Client Upgrade Task Sequence Template
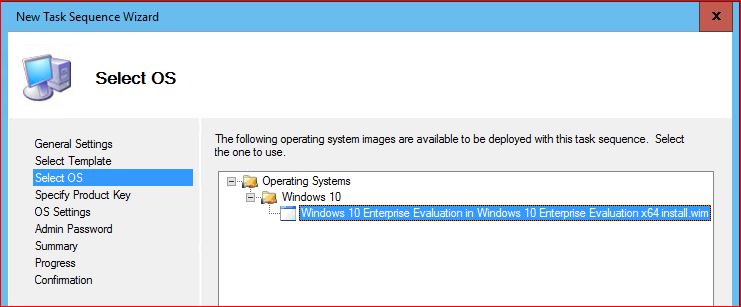
3. Select the previously imported Windows 10 as operating system and click Next.
Select Operating System for Task Sequence
Select Windows 10 Operating System for Task Sequence
4. Select the first option Do not specify a product key at this time for now on the Specify Product Key page and click Next.
Windows 10 Product Keys
Windows 10 Product Keys – Upgrade to Windows 10 Using MDT
5. Enter the Full nameOrganization and Internet Explorer Home Page correctly on OS Settings page then go to next page.
MDT OS Settings for Upgrading to Windows 10
6. If you like the local Admin account with a password, enter the password, otherwise select Do not specify and Administrator at this time on the Admin Password page and go to Summary page.
Windows 10 Admin Password
Windows 10 Local Administrator Password
 7. On the Summary page read the detail and click Next to being creating the upgrade task sequence. Finally on the Confirmation page of Task Sequence close the page.
Standeard Task Sequence Template to Upgrade to Windows 10 using MDT
Standard Task Sequence Template to Upgrade to Windows 10 using MDT
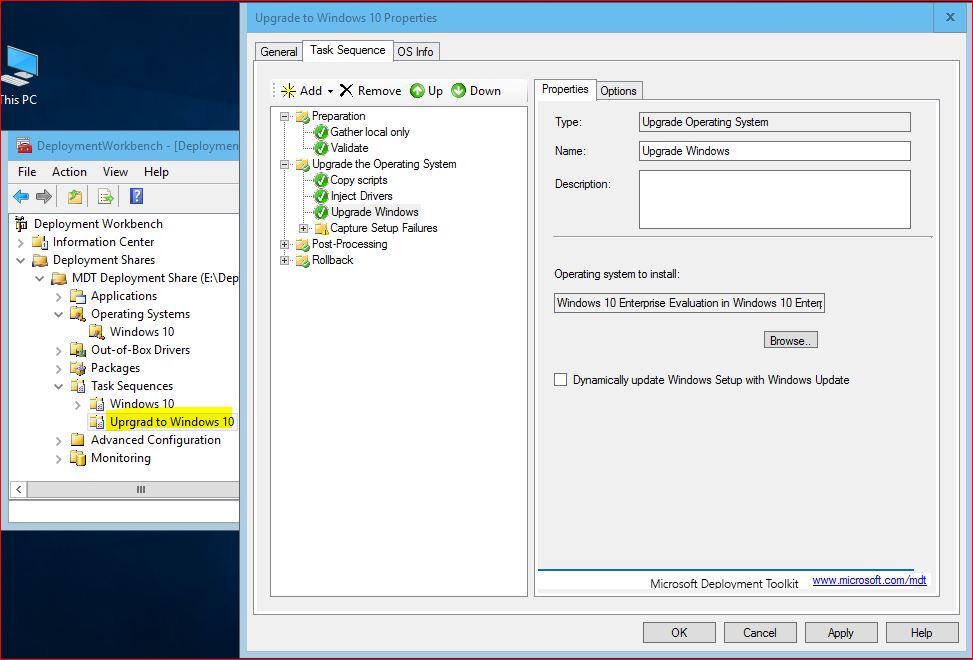
8. Now expand the Upgrade Windows 10 folder and right click the created task sequence then click Properties. See the options on the Task Sequence tab that everything is okay.
Upgrade to Windows 10 Using MDT Task Sequence Settings
Close Task Sequence properties and go to update the MDT deployment share.

Step 3: Update the Upgrade MDT Deployment Share

The final step before performing upgrade to Windows 10 using MDT, try to update the MDT deployment share.
  1. Right click MDT Deployment Share and click Update Deployment share then select Optimize the boot image updating process and click Next. 
Update the Upgrade Task Sequence
2. Read the Summary details and click Next to begin updating MDT Deployment share. Finally the update should be done successfully.
Update Successfully
Update Successfully
Close the page and go to begin Windows upgrading from Windows 7 or 8 to Windows 10.

Step 4: Upgrade to Windows 10 Using MDT

Lets begin with a Windows 8.1 to upgrade to Windows 10 using MDT in our lab. I hope you could perform all above steps successfully.
  1. Login to your old machine such as Windows 7 or Windows 8. Then run the Lite Touch script form Windows run like the screenshot. Click Yes to run the script.
Run Lite Touch Script
The Lite Touch script is a vb script that load the Windows Deployment Wizard from deployment server, where the MDT is installed.
2. When the Lite Touch script will load, select the upgrade task sequence and click Next.
Windows Deployment Wizard
3. Specify a product key if you have, otherwise select No product key is required then click Next. In a production environment you can activate your machine from KMS Server.
Specify Product Key to Upgrade Windows 10
4. Do you need to install or update applications also? If you don’t click Next and go to the next page. You can install or updated the applications from this section also. But I don’t want to update or install any software to testing lab.
Upgrade Office with MDT
5. Specify a strong password for Administrator for security reason then click Next.
Windows 8 Local Administrator Password
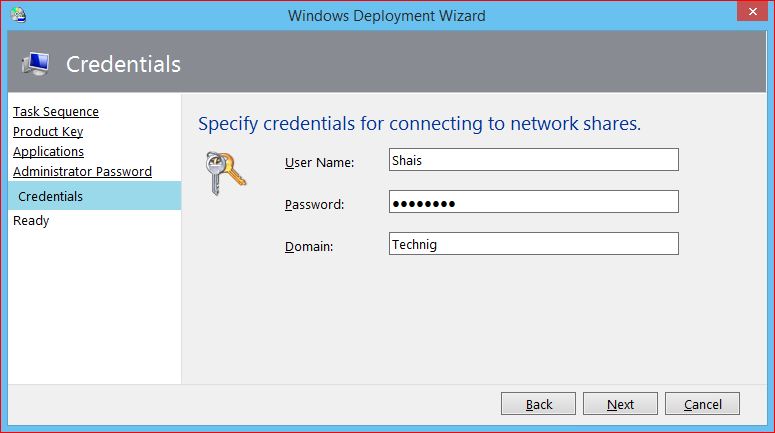
6. Type the appropriate deployment share domain account for connecting to network share then click Next. I’m using the domain admin user for this lab.
Credentials for Connecting to Network Shares
7. On the Ready to begin page, read the details and click Begin to start upgrade to Windows 10 using MDT form a network shared.
Ready to Begin Upgrade
8. Let the Windows deployment perform the upgrading from Windows 8 to Windows 10 successfully.
Running Lite Touch Installation to Upgrade to Windows 10
- See more at: http://www.technig.com/upgrade-to-windows-10-using-mdt/#sthash.2eU09gcC.dpuf
Tuesday 30 June 2015

keep your network home wireless Secure

5 Steps to Secure your home Wireless Network

Posted in ArticlesNetworkingSecurity • 7 months ago • Written by Shais • 7 Comments
Almost all houses are equipped with Wireless Network equipment nowadays, but most users are do not know enough about the security of Wireless Network. If we search around a bit carefully we find many Wifi Network with default name. When the SSID (Service Set Identifier) is by default or factory name, maybe the password is also.
So lets see some steps of securing a home Wireless network to protect our network from being hacked by hackers or neighbor kids;).

1. Find a Qualified Wireless Access Point for Wireless Network 

Buying a good branded Wireless Access Point (AP) which support newly strong wireless security protocols with flexible features and try to install and configure it correctly. If you don’t know how to install, configure and secure the WAP, ask  someone expert or read the guide Notes. Be careful, don’t used it by default.

2. Change the Default SSID of Access Point

Change the default name and hide it by turning off SSID broadcasting and connect all wireless devices manually. When a Wireless Network SSID is hidden the wireless access point doesn’t broadcast it’s name around and no one can find and guess it simply. But it’s possible to find with wireless Hacking tools.
Wireless Name
Wireless Name

3. Enable Security with WPA2 and Strong Password

Enable Security options of  Wireless Access Point with most strong wireless security protocol like WPA2 (Wi-Fi Protected Access II) and set a complex Password. A complex password is contain Number, Symbols, lower case letter and upper case letter.
Wi-Fi Protected Access

4. Enable MAC Address Filtering

MAC Filtering (Media Access Controller) prevent unknown devices from being connect to WAP without your permission. You see tow option, Deny and Allow, the deny option will deny the clients specified by any enabled entries in the list to access. Allow option will permit the clients specified by any enabled entries in the list to access the WAP.
Wi-Fi MAC Address filtering
Note: You can find MAC address of your connected devices from DHCP section of WAP and get the others from it’s network settings or using soft tools to find them. The easiest way to get MAC address of all devices, first connect them to WAP and then check the DHCP Clients List.
DHCP Clients list
DHCP Clients list

5. Change the Interface default user name and password

Change the factory default user name and password of web-based interface of Wireless Access Point and set different user name and strong password. Each manufacturer Wireless Routers has a simple user name and password like Admin, pass or 12345 to ease access for first time.
Change Wireless Access Point default password
Optionally, you can configure DHCP (Dynamic Host Configuration Protocol) to limit the range of IP address from DHCP scope.
DHCP Scope
DHCP Scope
Finally you must keep Wireless Access Point in a secure area or in a box and locked to prevent from being reset to factory settings. Don’t forget to check it up sometime and update your knowledge about Information Security.
So it is enough for Securing a SOHO (small office or home) network. If you don’t know the basic Wireless Access point configuration, I recommand you to read the How to Setup My Home Wireless Network? article.
- See more at: http://www.technig.com/5-steps-to-secure-your-home-wireless-network/#sthash.bTVJNovR.dpuf

five way to hacking wireless

5 ways to Hack Wireless Network

Posted in ArticlesLinuxSecurity • 7 months ago • Written by Shais • 18 Comments
In previews article about securing  or Hack Wireless Network “5 Steps to Secure your home Wireless Network” we understand pretty enough for securing home Wireless Network. But now it’s time to know how the hackers break and get access to your Wireless Access Point WAP?
In this article I’m gonna to Show you 5 ways to pen test a wireless network. It’s all for educational purpose only and don’t use in wrong way.
The Tools we need is Kali Linux or Backtrack. Download the latest Kali Linux from here.
First one is using Wifite to capture Wireless traffic and save it as a file, and next crack the saved Client handshake in the file with aircrack and creating word list with Crunch.
In order to do this, open terminal and type wifite and hit enter.
Wifite Result
Wifite Result
Let the Wifite search and find all Wireless SSIDs.
When you find them press Ctrl+C to stop searching and select the number of network you want to hack it.
Searching Wireless Access Point
In the point of WPS Attack, press Ctrl+C to reject the WPS Attack.
Reject WPS attack
Reject WPS attack
Wifite forced the clients to authenticate with WAP by sending de-authenticate request.
Send de-authenticate request
Authentication is the process of sending user name and password from client to WAP. When the clients send request, the packet will captured by Wifite. It continue lessening for handshake…
Lessening for client handshake
Now it found, captured and saved a handshake packets.
New handshake found and captured
Now try to crack the captured files with Aircrack and Crunch. To do this type the commands like the screenshot and press enter.
Create Wordlist and Cracking
Wile the Crunch create password list and the aircrack check them to find the password.
Cracking Process
Cracking Process
It takes time too much just for numbers but be patent, and if you try to crack alphabets it’s possible but need more time and a strong processor.
The Second way: Using airmon-ng to set the wireless card to monitoring mode and airodump-ng for capturing clients handshake. For cracking again you must use aircrack with a password list.
Continue…
TAGS: 
About this Author
Shais
Is a Computer Network and Information Security instructor for almost three years. Now I'm trying to share my experience through this website.

18 Comments so far. Feel free to join this conversation.

  1. RazaSarwarDecember 5, 2014 at 6:26 am - Reply
    Hi brother I downloaded Kali Linux software and save it in bootable USB flash drive im using acer touch screen laptop windows 8.1 but I cant boot from usb flash I tried a lot it cant be boot and install so is anyone here to help me?
    • Shais
      ShaisDecember 5, 2014 at 9:37 am - Reply
      Hi dear Raza.
      It’s not work if you just copy the Kali image file to a USB flash.
      Create a bootable USB according to this topic “How to Create a Kali Linux Live and Bootable USB?“.
      If you have any question let us know.
      Good luck.
      • RazaSarwariDecember 6, 2014 at 6:01 am - Reply
        Hi Dear Shais, I tried the universal usb installer and now how to boot it in my laptop and how can i change the settings in UEFI to make usb first boot device?
        • Shais
          ShaisDecember 6, 2014 at 3:12 pm - Reply
          Just enable legacy boot option and disable UEFI boot option. This will let you boot the system with USB.
          If you can’t do that, tell the model of you laptop and we will show you in details.
  2. RazaSarwariDecember 7, 2014 at 6:26 am - Reply
    Acer: Aspire V3-111P this is the model number..
  3. RazaSarwariDecember 7, 2014 at 6:52 am - Reply
    Thanks brother for the help now I can boot it but teach me how should I install kali Linux which options should I select??
  4. RazaSarwariDecember 8, 2014 at 5:55 am - Reply
    and now I cant select any options when I boot kali Linux my keys are stop working cant select any options even the enter button doesn’t work..
  5. Mujtaba NaseriFebruary 18, 2015 at 7:33 pm - Reply
    Dear admin,
    when we typed “wifite” it is not showing SSIDs, so in this case what is the solution??? we installed the “Install VMware Tools in Kali Linux” but again it’s not working,,,,
    • Shais
      ShaisFebruary 18, 2015 at 9:27 pm - Reply
      Hi
      Fist test the connectivity of your wirless card and be sure it works correctly.
  6. khanMarch 11, 2015 at 11:56 pm - Reply
    the link for securing wifi is not available
  7. Raza SarwariMarch 26, 2015 at 6:27 pm - Reply
    Salam Shais sir I have install kali Linux on VMware but when I try to hack any wifi, first I typed: wifite. but it doesn’t shows any wifi it says that you need to plug in wifi device. so what should I do?
  8. nowroz aliApril 21, 2015 at 7:37 pm - Reply
    when handshake packets captured they will auto in your desktop
  9. nowroz aliApril 21, 2015 at 7:39 pm - Reply
    l means they will auto save the captured file in our camputer
    • Shais
      ShaisApril 21, 2015 at 11:48 pm - Reply
      Yes it will save it auto, but you can select the path for captured files also.
  10. nowroz aliApril 22, 2015 at 11:00 am - Reply
    how to fixed Airodump, fixed channel mon0 -1

Leave A Response

- See more at: http://www.technig.com/5-ways-to-hack-wireless-network/#sthash.dkwX9yE4.dpuf